Pipedream MCP Node - User Guide
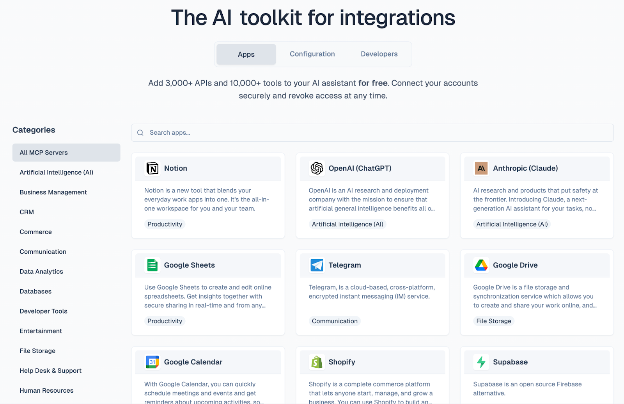
The Pipedream MCP node connects your CiniterFlow agents to 3,000+ APIs and 10,000+ pre-built tools through Pipedream Connect. Your agents can send Slack messages, create GitHub issues, update Google Sheets, manage Notion pages, and much more — all using a standardized MCP (Model Context Protocol) interface with fully-managed OAuth.
1. Prerequisites
Before using the Pipedream MCP node you need:
- A Pipedream account: sign up at pipedream.com (free tier supports up to 1,000 connected accounts).
- A Pipedream Connect project: create one via the Pipedream dashboard or CLI (
pd init connect). - An OAuth client: generated inside your Pipedream workspace's API settings. This gives you a Client ID and Client Secret.
2. Setting Up Pipedream Credentials
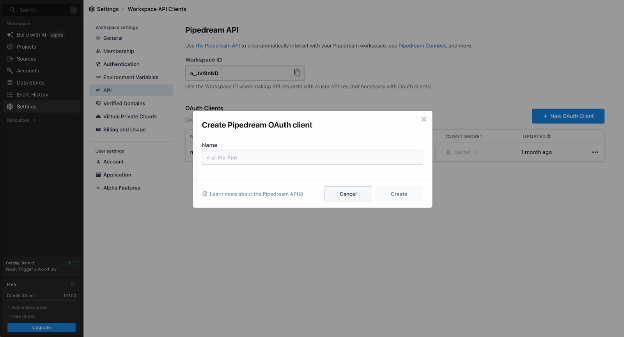
2.1 Create an OAuth Client in Pipedream
- Go to pipedream.com/settings/api.
- Click New OAuth Client.
- Name your client (e.g.,
CiniterFlow Agent) and click Create. - Copy the Client Secret immediately, it will not be shown again.
- Copy the Client ID from the list.
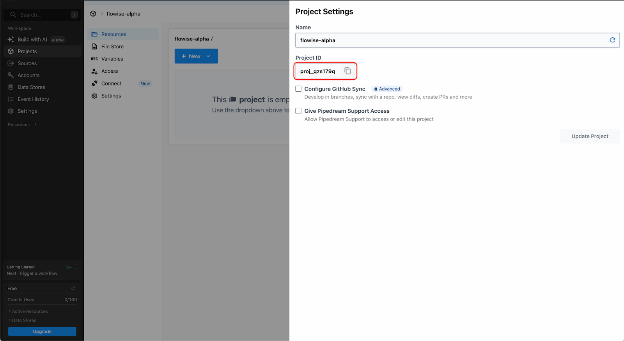
2.2 Find Your Project ID
- Open your Pipedream project from the dashboard.
- The Project ID is visible in the project settings (format:
proj_xxxxxxx).
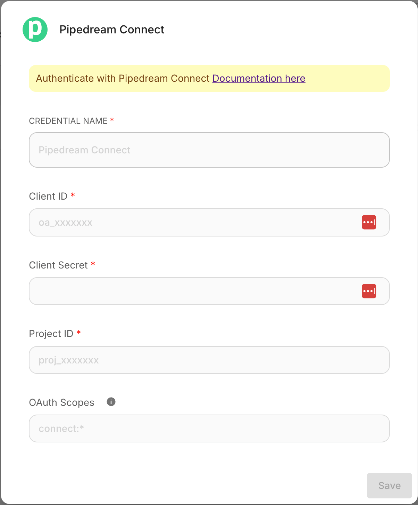
2.3 Add Credentials in CiniterFlow
- In CiniterFlow, navigate to Credentials from the sidebar.
- Click Add Credential and search for Pipedream Connect.
- Fill in the following fields:
| Field | Description | Example |
|---|---|---|
| Client ID | The OAuth Client ID from Pipedream | wBSGhxxxx |
| Client Secret | The OAuth Client Secret (stored securely) | •••••••• |
| Project ID | Your Pipedream Connect project ID | proj_xyz789 |
| OAuth Scopes | (Optional) Space-separated scopes. Defaults to connect:* if left blank. | connect:* |
- Click Save.
Tip: For production environments, use the narrowest scopes you need. See Pipedream Authentication Docs for available scopes.
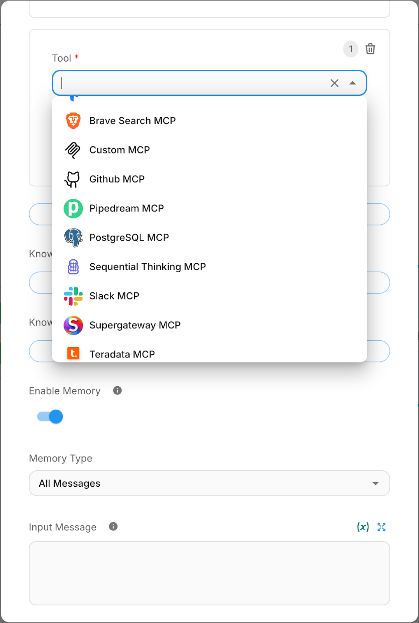
3. Adding the Pipedream MCP Node
- Open a chatflow in the CiniterFlow canvas.
- Add an Agent node (e.g., Tool Agent, OpenAI Function Agent).
- From the Tools (MCP) category, drag the Pipedream MCP node onto the canvas.
- Connect the Pipedream MCP node's output to the Agent node's Tools input.
- Configure the node (see next section).
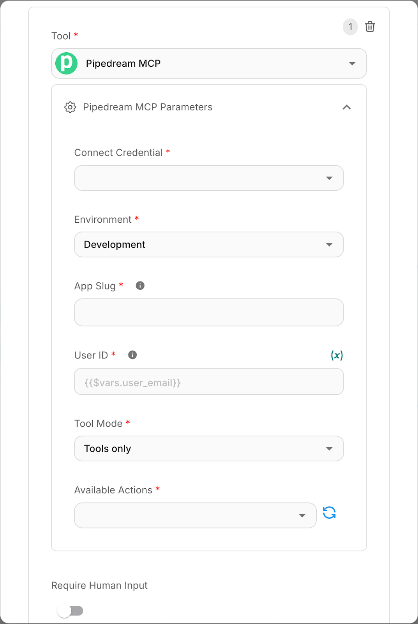
4. Node Configuration Reference
| Parameter | Type | Required | Description |
|---|---|---|---|
| Connect Credential | Credential selector | Yes | Select the Pipedream Connect credential you created in Step 2. |
| Environment | Dropdown | Yes | Development or Production. Controls which Pipedream environment your connected accounts and tool calls run against. Use Development for testing. |
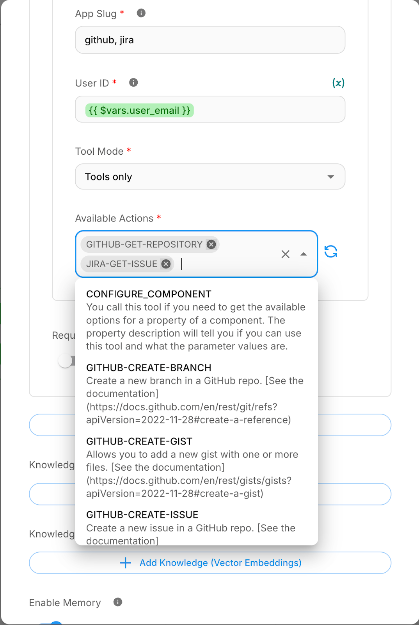
| App Slug | Text | Yes | The unique identifier for a Pipedream app (e.g., slack, gmail, notion, linear). Browse all available apps at mcp.pipedream.com. Supports multiple apps via comma separation (e.g., slack,notion). |
| User ID | Text (accepts variables) | Yes | A unique identifier for your end user. Supports CiniterFlow variables {{$vars.user_email}} and flow variables {{$flow.sessionId}}. See Section 7. |
| Tool Mode | Dropdown | Yes | Currently supports Tools only mode, which exposes the app's pre-built actions as individual tools to the agent. |
| Available Actions | Multi-select (async) | Yes | After filling in App Slug and User ID, click the refresh button to load the list of available actions for the specified app(s). Select the specific actions you want to expose to your agent. |
5. Selecting Actions
Once you provide a valid App Slug and User ID, click the refresh icon next to Available Actions. The node will connect to Pipedream's remote MCP server and retrieve all available tools for the specified app.
Each action is listed with:
- Name: the tool identifier (displayed in uppercase), e.g.,
GITHUB-GET-REPOSITORY - Description: what the tool does, e.g., "Get Information for a specific repository"
Select only the actions your agent needs. Fewer tools help the LLM make better decisions and reduce token usage.
Finding App Slugs
The app slug is the lowercase name shown in the URL on Pipedream. For example:
pipedream.com/apps/slack→ slug isslackpipedream.com/apps/google-sheets→ slug isgoogle-sheetspipedream.com/apps/notion→ slug isnotion
Browse the full catalog at mcp.pipedream.com or pipedream.com/explore.
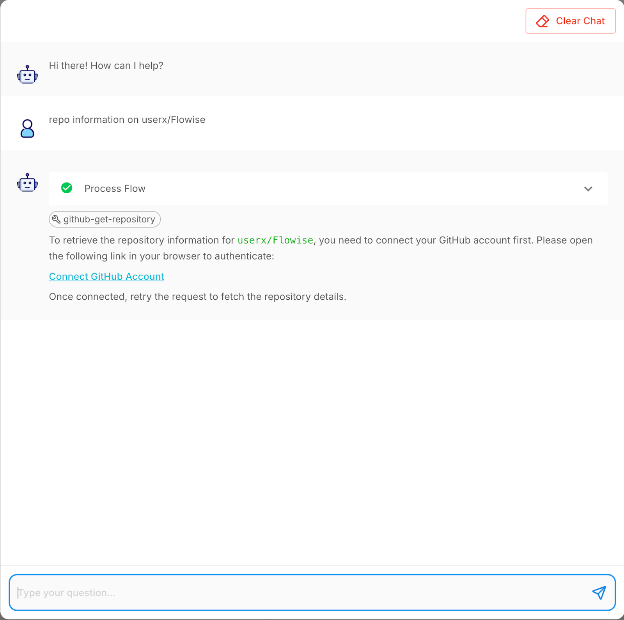
6. Account Connection Flow
When an agent invokes a Pipedream tool for a user who has not yet connected their account for that app, Pipedream returns a Connect URL. The Pipedream MCP node automatically detects this and provides the connect URL to the user. The connect URL opens a Pipedream hosted page where the user authorizes the app (e.g., signs in to Slack via OAuth). The link is scoped to the specific user and expires after 4 hours.
Key points:
- The connect URL renders as a clickable link in the chat UI.
- Once the user connects their account, subsequent tool calls will execute normally.
- User credentials are encrypted at rest on Pipedream's servers and never exposed to the LLM.
7. Using Variables for User ID
The User ID field identifies the end user in Pipedream Connect. This is critical for multi-user scenarios where each user connects their own accounts.
Supported Variable Types
| Variable Syntax | Source | Resolved At |
|---|---|---|
{{$vars.user_email}} | CiniterFlow workspace variables | Design-time + Runtime |
{{$flow.sessionId}} | Flow context (session) | Runtime only |
Workspace Variables
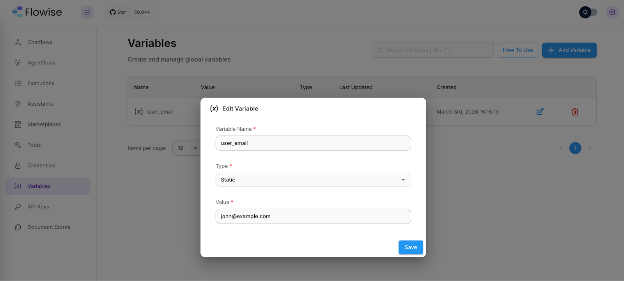
- In CiniterFlow, go to Variables from the sidebar.
- Create a variable (e.g.,
user_emailwith valuejohn@example.com). - In the Pipedream MCP node, set User ID to
{{$vars.user_email}}.
Flow Variables
Use {{$flow.sessionId}} to automatically scope Pipedream accounts per chat session. This is useful when each session represents a different user.
Important: Flow variables like {{$flow.sessionId}} are only resolved at runtime. When clicking "refresh" on Available Actions in the editor, the node uses a fallback preview user ID (ciniterflow_preview_user) so that action listing still works.
Static User ID��
For single-user or testing scenarios, you can also enter a plain string like test-user-1 or admin@mycompany.com.
Allowed characters: Letters, digits, . _ @ + - (max 250 characters).
8. Security Best Practices
| Practice | Details |
|---|---|
| Enable "Require Human Input" | For destructive or write actions (sending messages, deleting data), enable human approval on the Agent node. |
| Use narrow OAuth scopes | In your Pipedream credential, specify only the scopes you need. |
| Use per-user IDs | Always use a unique User ID per end user. This ensures Pipedream scopes credentials to individual users. |
| Use Production environment in prod | Switch from Development to Production when deploying. Pipedream keeps separate credential stores per environment. |
| Select minimal actions | Only expose the actions your agent needs. Fewer tools reduce the attack surface and improve LLM accuracy. |
| Protect your Client Secret | Never expose the Client Secret in client-side code or version control. CiniterFlow stores it encrypted. |
9. External References
| Resource | Link |
|---|---|
| Pipedream MCP Developer Docs | pipedream.com/docs/connect/mcp/developers |
| Browse Available MCP Apps & Tools | mcp.pipedream.com |
| Explore Pipedream Actions | pipedream.com/explore |
| Pipedream Connect Overview | pipedream.com/docs/connect/mcp |
| OAuth / Authentication Docs | pipedream.com/docs/connect/api-reference/authentication |
| App Discovery | pipedream.com/docs/connect/app-discovery |
| Connect Quickstart (CLI) | pipedream.com/docs/connect/quickstart |
| Pipedream Security & Privacy | pipedream.com/docs/privacy-and-security |
| MCP Tool Modes (Sub-agent / Full-config) | pipedream.com/docs/connect/mcp/tool-modes |